There’s only so much you can do when it comes to computer cases. Sure you can add more fans and make cable management modifications but without science behind it, you’ll probably do more harm rather than improving your computer’s thermals. While most manufacturers go with form over function, Silverstone created the Raven series. Its sole purpose is to create a chassis that has both form and function. Science tells us that warm air is lighter than cold air so it goes up. If applied to a computer chassis, it’s a lot easier to push out warm air if its direction is going up. Most computer cases at this generation follow the design where cold air is usually taken in from the front or the side and is exhausted towards the back. While this design has been with us for years now, it is by no means efficient when it comes to cooling the components of your computer.
The first Raven has the principle; it was a ground-breaking launch, capitalizing on one of physics basics – stack effect. Sadly, in my opinion, it failed to deliver what was promised. It contained way too many plastic parts which resulted to it being a lot heavier than your usual chassis; the sliding front panel was a little loud and the two fans at the bottom were not enough to push cold air through the system to obtain a significant difference in temperature. Because of the excessive use of plastics and the full-tower specification, the chassis was a little bit on the expensive side. I’ve had Fine Upgrade’s road show rig for a week before I had to send it back because there’s just no way would the system run for a few minutes before shutting down due to overheating. We are now going to take a look at the Raven 02 and see for ourselves the changes that SilverStone made to the Raven. Let’s find out what they have to say about the Raven 02.
The first Raven has the principle; it was a ground-breaking launch, capitalizing on one of physics basics – stack effect. Sadly, in my opinion, it failed to deliver what was promised. It contained way too many plastic parts which resulted to it being a lot heavier than your usual chassis; the sliding front panel was a little loud and the two fans at the bottom were not enough to push cold air through the system to obtain a significant difference in temperature. Because of the excessive use of plastics and the full-tower specification, the chassis was a little bit on the expensive side. I’ve had Fine Upgrade’s road show rig for a week before I had to send it back because there’s just no way would the system run for a few minutes before shutting down due to overheating. We are now going to take a look at the Raven 02 and see for ourselves the changes that SilverStone made to the Raven. Let’s find out what they have to say about the Raven 02.
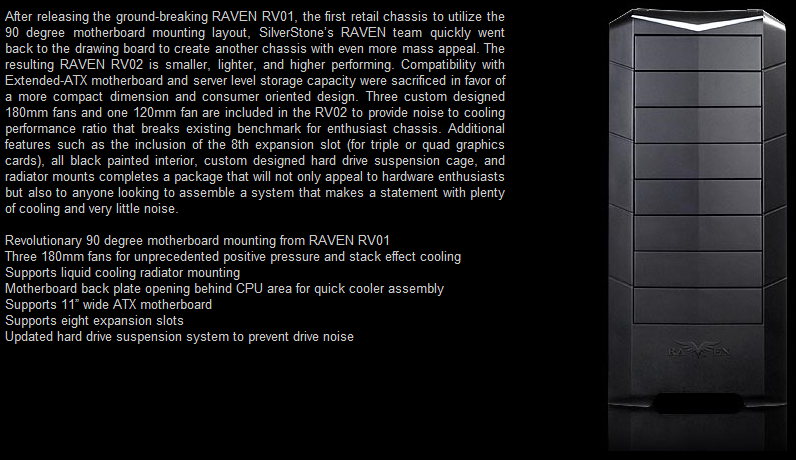
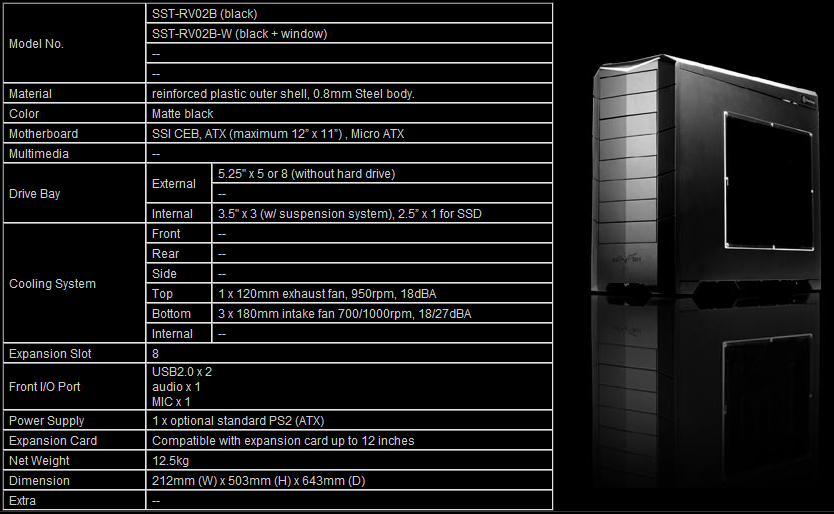
Obviously, the Raven 01 can’t be tweaked much to improve performance so they redesigned the chassis so that it would be easier to produce and more importantly, perform much better. Before we dig in to my simple review, let’s take a look at the chassis’ specifications so we’ll know how it differs from its predecessor.
Featured Photos and a Closer Look
As you can see there is only 1 exhaust fan and it’s in an odd location – the top. Fear not my dear friends, as I’ve said regarding stack effect, you simply need to push the warm air up with cold air through the gigantic 180mm fans at the bottom. Another thing worth mentioning (although you were probably expecting this) is the motherboard orientation, if this is the first time you’re reading about the Raven series, the motherboard isn’t exactly standing up. We’ll check it out later. Unlike motherboards and other computer components where they’re a lot easier to photograph, chassis are a lot bigger so they require a good source of light, an excellent background and an awesome camera to capture their image. With my cheapo (and borrowed) digital camera, I’ll save my personal photos of the case for the installation and use the featured photos available from Silverstone Raven RV02’s official website.


The top panel contains the signature LED from the Raven RV01, a v-shaped led that turns on blue when the computer is turned on; a little too bright for some people but it works just fine for me. Front bezel is a uniformed look from top to bottom and later on you’ll find that there’s a tricky way of removing this. Top panel also contains 2 USB ports, a microphone jack and a headphone jack. The RV02 is a little too conservative in here if compared to the RV01 but personally; I’ve not known anyone who uses the eSATA port on front panel before, for mainstream users at least. The tool-less 5.25 bay makes a comeback here, it’s very simple and yet works flawlessly. Only one side is available though, the other side needs screws if you really want to secure the drives for transport. There is one serious drawback to this chassis one should take note; the RV02 is only capable of supporting up to 3 hard drives through the designed hard drive cage. What I don’t understand is that Silverstone could’ve easily created a second cage which should take up the upper 3 5.25 bay. Who fills up their 5 optical drive bay, anyway?
You also have a mounting mechanism for your SSD drives on the opposite end of this (not shown). Only 1 SSD is supported which means, there’s no way you can run RAID with your SSD which is a bit of a bummer but considering the price of SSDs, it’s not worth it…yet.


From this angle, you’ll find the top panel where the warm air is exhausted; again, removal is a bit tricky because the cover uses a snap-on locking mechanism where you simply have to pull it up to release which will then give you access to the back i/o panel. The bottom of the RV02 contains the cold air intake holes and the respective rubberized holes for you water-cooling aficionados. There is a very good clearance from the chassis to the table/floor which is about 1.5 inch – enough to provide the system with cool air.


This is the heart of the RV02 cooling system, 3 180 mm fans capable of pushing 100 cfm of air at a very quiet 18 decibels at 700 – 1000 rpm. Should you wish to upgrade to a higher-cfm fan though, Silverstone has 180 mm fans with 1300 rpm pushing in 150cfm of air with a static pressure of .48~2.38 mm H2O – whatever that means. The nice thing about the optional fan though is that they come with a fan controller and is colored white which basically matches the black overall color scheming of the RV02. These huge intake fans have removable and washable dust filters to keep everything inside, nice and clean. The honeycomb grills are not only there for protection from the fan blades but also for an efficient airflow. Without the honeycomb grills, air would be inefficiently exhausted to the case where the grills provide a straight exhaust all the way towards the top of the chassis. The lone 120mm fan on top is a reinforcement to exhaust warm air generated by your CPU; however, this fan is only rated at 950 rpm maximum which clearly, isn’t up to the task if you wanted more performance.


This is how the internals of the RV02 looks like, as you can see, there are numerous holes that are used for cable management; even the installation of a CPU bracket is simplified due to a hole provided for easy access. Last featured photo is the back panel where it only contains a filtered intake holes for your PSU if you can mount it in this position. The filter is once again, removable and washable for easy maintenance. If you haven’t noticed, the motherboard is not only mounted on a 90 degree angle but is on the left side so the windowed panel is the right side cover. The reason for this is that most ports are on the lower left hand side of the motherboard near the southbridge chipset so if you keep the same 90 degree orientation but mount the hard drive to the right side, you’re going to have problems with connecting those cables from the front of the computer. Silverstone has clearly thought of this obstacle hence the right-side mounting. That pretty much sums it up for the quick tour around the Raven RV02. The next pages will show you how your system would look like during installation.
Installation and the Good Stuff (Testing)
Let’s start by enumerating the test bed and my personal computer :).
The comprehensive manual that came with the chassis suggests starting with the PSU installation. There are two ways to mount the PSU, you can either use the back intake panel so that the PSU fan is positioned facing towards the back where it sucks fresh air though the PSU ventilation holes or the PSU fan facing the inside where it draws air from the internals itself. If you happen to have a PSU with long cables, installing it with the fan using the intake is recommended, you just have to make sure that at least 2/3 of the fan can absorb air.


You need to make sure that the PSU is securely attached from the top because you cannot risk it falling down to the bottom hitting the 3rd 180mm fan. For added support, the accessories include a plastic bracket where you have to secure from the other end and a Velcro tape to prevent the PSU from shaking if your move it more often than usual. In my case, I had to install it with the fan drawing air in from the inside because the cables can no longer reach the drives. Just below the PSU exhaust vents are the controls for the 180mm fans. Even when set to high, the fan are barely audible so you can leave this setting on high always


Before you install the motherboard, you would need to remove the hard drive cage first and attach your hard drives from there. The cage screws also have rubber washers to prevent vibration resulting in noise. You need to start with the hard drive before the motherboard because once you installed the motherboard, you can no longer remove the hard drive cage as it would hit into the board itself. There is a work around for that, though. Say you messed up and the motherboard is already in or you need to remove /add 1 of the hard drive(s), simply pop out the 3 bottom drive bay covers though the right side with a screw driver enough to fit in the holes and the slide the hard drive from there. Easy does it?


For the CPU installation, if you’re still on socket LGA775, the CPU bracket hole would be a friend. On the x58 however, some motherboards have the CPU socket lowered down a bit so this feature would become useless; the rest of the components simply go where they go. The cable management holes are strategically located so that you can manage them easily. This and the provided re-usable cable tie do the job of clearing the internals clutter-free for an optimized airflow. Don’t forget to use the 3-pin fan header to molex adapter to make use of the 180 mm fans. For users with fixed cable PSUs, you’ll find an ample space to neatly stack your cables on the right side fan below the power supply provided that you’re not using this area for water-cooling. Else, you’ll have to be creative or go modular.


When everything is done, re-attach the covers and start admiring your computer in the shiny new RV02 chassis. If you haven’t noticed already, the case is mid tower but longer than usual mid towers because of the added length of the PSU. A friend calls this a school bus while another friend calls this one an extended mid tower. However you want to call it isn’t she a beauty? Now, let’s see what she’s got.
Testing and Conclusion
The test was performed with Prime95 Small FFTs and Furmark 1.7 running simultaneously to simulate CPU and GPU loads for 1 hour. The EP45-UD3R is pretty much an entry-level board, so you wouldn’t be able to find sensors except for the critical areas. As you can see, the temperatures were within safe limits. Unfortunately, if you happen to be running a similar cooling solution like the Corsair H50, you’d need to use push-and-pull fan configuration to get the most out of it since the cooler is designed to intake cold air from outside the chassis but in this case, it acted as an exhaust. What I did was I left the 120mm fan that came with the Raven RV02 and added the Corsair fan for a push-and-pull effect and that basically solved my temperature woes. I’ve had slightly lower temps when the RV02 is paired with a tower-based cooler like my Sunbeam Core Contact and Xigmatek Dark Knight but the difference was negligible (1 – 2 degrees lower than the H50) but because these types of cooler disperses heat on the surrounding area, the system temperature where its sensor is located just beside the northbridge chipset goes a little lower (40c). As far as the sound is concerned, you can barely hear the case at all.


Clearly, the RV02 is designed with tower-based coolers and cools the graphics card effectively even if you’re running multiple graphics cards. I may not be using this configuration but with the Furmark test, this has been the lowest temperature I’ve seen so far with my 9800GT subjected to Furmark’s stress test. It usually goes as high as 70c during load on my Antec 300 but in this case, it hovered somewhere between 55c which is a 15c difference when compared to my previous setup. Sadly, the hard drive temperature is a little bit high, with the Antec 300 where it gets unobstructed direct airflow, the hard drives stay at 36c – 38c but in this case, 38 and 42 is bit higher. Then again, my hard drives are set to operate within 0c and up to 75c as the specifications would say. This is due partly to the cage where the air intake is obstructed and the spacing is a little too close with each other but again, they were within operating ranges so there’s really nothing to worry about but if the fans are replaced with a higher static pressure ones, I’m sure the temps would drop a lot. I’m not sure though how it would operate with the famed WD Raptors as those drives are known to be super hot. To sum everything up, I will summarize the pros and cons of the Silverstone Raven RV02.
PROs:
- Excellent airflow configuration
- Awesome CPU and GPU cooling performance
- Very nice cable management
- Easy to maintain because of fan filters and very spacious
- Very solid construction
- Runs very quiet
- Complete fan set (unless you plan to replace them with high static pressure and cfm fans)
- Exterior and interior is painted black for aesthetics
- Cheaper and much better performer than RV01 (lesser plastics, too)
- Hard drive limited to 3 (they could’ve easily taken up the 3 bays with a second HDD cage)
- Included fans are entry level (enough to get awesome temps, though)
- Need longer PSU cables (preferably, modular :))
- Extended mid-tower (doesn’t fit on my table but not really a con)
Overall, I am proud to say that this is one heck of a case and I would gladly recommend it to anyone who’s looking for a case that has aesthetics, functionality and performance. Silverstone has really nailed this one with the Raven RV02. As per Ryan, if I am to give this case a rating, I give it 9.9 out of 10 coconuts because if the case had a second hdd cage, I would’ve neglected its other shortcomings. :)


